network printer in windows
How so I setup a network printer in windows?
- Select Start>Settings>Printers. In WinXP Start>Printers & Faxes
- Click the Add a Printer icon. In WinXP, the icon will be under "Printer Tasks" in the left panel.
- In the "Add a Printer Wizard" window, (not shown) CLICK NEXT.

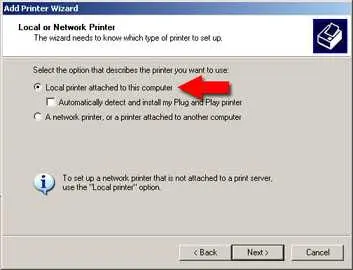
- In the "Local or Network printer"' window select "Local printer attached"
- Make sure the Auto-detect checkbox is unselected.
- CLICK NEXT.

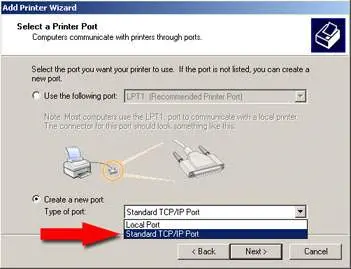
- In the "Select a Printer Port" window, choose, "Create a New Port" and then select "Standard TCP/IP".
- CLICK NEXT.

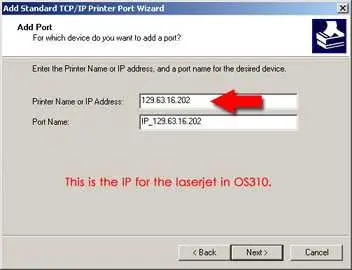
- In the "Add Port" window, enter the IP number of the printer.
- CLICK NEXT

- At the next screen, (not shown) CLICK FINISH
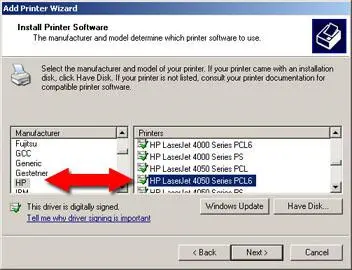
- At the "Install Printer Software " screen select the type of printer that you are using.
- Olsen 310: HP LaserJet 4050N
- Olsen 308: HP LaserJet 8000N
- Olsen 314: HP LaserJet 4050N)
- CLICK NEXT.
- If you are prompted to keep or replace the driver, keep it. CLICK NEXT
- Give the printer a name. Something that contains the printers location would be helpful.
- CLICK NEXT
- At the next window, do not share this printer.
- Click NEXT.
- Print a test page
- CLICK NEXT.
- CLICK FINISH.
